Second Boer War (1899-1902): History, Major Causes, Phases, Concentration Camps, & Outcome

The Second Boer War is also known as the South African War or the Anglo-Boer War or the Second War of Independence.
Also known as the South African War or the Anglo-Boer War, the Second Boer War was an absolutely brutal war fought between Great Britain (The British Empire) and two Boer nations: the Orange Free State and the South African Republic (SAR) or Transvaal.
The war lasted almost three years, beginning on October 11, 1899, and ending on May 31, 1902. Britain, which at the time was on the ascendency, having acquired the Indian subcontinent in the latter decades of the 19th century, fought the Boer Republics over political power and influence in Southern Africa.
After a long, hard-fought and bloody conflict, the two Boer republics lost to Great Britain and were eventually integrated into the British Empire. The war was one of the most brutal and costly battles for the British in the 19th and 20th centuries, costing them over £200 million.
Although the British won the war, many historians view it as the battle that cracked Great Britain’s façade of impenetrable global domination. This is owing to the unexpectedly protracted nature of the war and the demoralizing British casualties sustained while battling a less-numbered and hastily formed Boer army.
But what really triggered the Second Boer War? And why did such a mighty power as Britain struggle to defeat the guerrilla warfare tactics of the Boers?
Below, World History Edu explores the major causes, battles, and atrocities and war crimes committed during the Second Boer War.
A Brief History and Background of the War
In the mid-17th century, the Dutch colonized territories in southern Africa. They then settled in the region known as the Cape Colony. Since they were primarily farmers, they seized many lands from the South African natives and took them as enslaved people for labor. As a result, they were often called “Boers,” which meant “farmers” in Dutch. However, they referred to themselves as “Afrikaners” and spoke a Dutch dialect called Afrikaans.
During the Napoleonic Wars in 1806, Great Britain seized total control of the Dutch (Boer) dominated Cape Town and the Cape Colony. In the decades that followed after the Britain’s seizure of vast territories in the region, many minor conflicts broke out between the British administration and the Boers over slavery rules, legal systems, and cultural outlooks.

Orange Free State, one of the independent Boer republics that fought against the British during the Second Boer War.
Those conflicts compelled a great number of Boers to embark on what came to be termed as the Great Trek (between 1835 and 1840), in which they migrated from the Cape provinces and settled in places deep into the interior, including arriving as far as what is now present-day Mozambique. The Boers went on to establish two new Boer republics: the Transvaal and the Orange Free State. The British saw the Great Trek as very beneficial to their strategic interest as those Boer republics provided a buffer to English settlers down south.
Flag of the South African Republic (SAR), also known as the Transvaal Republic. The republic was independent from 1852 to 1902, when it was annexed into the British Empire following the end of the Second Boer War.
In time however, greed and ambition inspired the British to eye a slice of the Boer republics; they wanted to expand and conquer the new Boer republics. By the 1840s, they had seized control of territories that shared borders with the Boer republics. This led to the First Boer War between 1880 and 1881. Against all odds, the Boers won a decisive victory, forcing the British to acknowledge the independence of the two Boer republics.
The Transvaal Gold Rush and Other Major Causes of the Second Boer War
Between 1884 and 1886, many British immigrants flooded South Africa after news broke that large deposits of gold had been discovered in the region. As a result, the possibility of an even bigger battle for control of the new Boer republics became inevitable.
Below are explanations of the leading causes of the Second Boer War:
-
The discovery of large gold deposits in the South African Republic in the mid-1880s.
In the mid-1880s, many English-speaking people immigrated to Southern Africa for abundant wealth when news broke that the region was flooded with gold. The Boers (Afrikaners) referred to the English-speaking people as Uitlanders (meaning “Outlanders”). Most Uitlanders were very influential and could acquire most of the goldfields.
However, the Boers saw their presence as a threat to their culture and resources. As a result, they disagreed with them on many issues until the Second Boer War eventually broke out in 1899.
-
The Uitlander Franchise.
The Transvaal government saw the Uitlanders as threats to their national independence and resources. Therefore, to maintain their control of the gold mines, they created laws that restricted the voting rights of Uitlanders. These laws became known as the “Uitlander franchise.” It stated that only foreigners who had stayed in the Transvaal for over 14 years could vote.
However, some Uitlanders believed they deserved equal voting rights since they had significantly contributed to the republic’s mining of its resources. As a result, the Transvaal government created the First Volksraad, giving foreigners more voting opportunities.
The creation of the Second Volksraad in 1890 worsened the tension and raised the stakes for war. It stated that foreigners could apply to become citizens of the Transvaal after staying in the country for just two years.
-
Disagreement of ideologies between political leaders
The opposing views of various South African political leaders in the 1890s precipitated the Second Boer War. Paul Kruger served as president of the Transvaal, and Cecil John Rhodes was the leader of the Cape Colony. Rhodes, a native of Britain, amassed wealth in South Africa through diamond mining. He supported the British colonial strategy of unifying South Africa under their dominion. On the other hand, Kruger was a South African-born politician who unequivocally supported Boer’s independence. As a result, the two leaders were at constant loggerheads.
-
The Jameson Raid
The Jameson Raid of 1896 was an attempt at a coup d’état to seize control of Johannesburg and overthrow the Transvaal government. Cecil Rhodes, the prime minister of Cape Town, and Alfred Beit, a gold baron from Johannesburg, collaborated on the initiative. The conspiracy came to be known as the Jameson Raid because British political leader, Starr Jameson, led the troops in the raid.
The raid began on December 29, 1895, and ended on January 2, 1896. It was a total disaster. Its failure brought huge humiliation for the British. Rhodes was subsequently forced to resign as the leader of the Cape Colony. Much worse, the botched raid caused political tensions between the British and Boers in South Africa to worsen, increasing the chances of the war.
-
The Bloemfontein Conference fails to resolve heightened political tension between the Boers and Britain
To avert a war between the South African Republic (Transvaal) and Britain, Marthinus Steyn, leader of the Orange Free State, convened the unsuccessful Bloemfontein Conference of 1899.
Conference participants included SAR president Paul Kruger and British Commissioner Alfred Milner. The conference’s failure was mainly due to Milner’s rejection of Kruger’s concession offer to Britain.
Organized by Orange Free State president Martinus Theunis Steyn, the Bloemfontein Conference was held between May 31 and June 5, 1899 to resolve the differences that existed between British High Commissioner Alfred Milner and Transvaal President Paul Kruger. The former wanted the Transvaal government to immediately grant British migrant workers (“Uitlanders”) voting rights as well as bring the Volksraad (i.e. Transvaal Parliament) under the British Parliament. Image: Paul Kruger, leader of the South African Republic (Transvaal) in the Boer fight against the British
In 1899, the Transvaal extended the Uitlander franchise. In exchange, they wanted the British to refrain from interfering in the country’s internal affairs. Kruger further demanded that the British give up their claim to govern the Transvaal and allow external arbitrators to settle unsolved conflicts between them.
However, British secretary Chamberlain turned down Kruger’s demands. He believed the British army could easily conquer the Boers and seize power.
Transvaal eventually realized that Britain never wanted a peaceful agreement. They then collaborated with the Orange Free State, planning for an offensive.
On October 8, 1899, Transvaal issued an ultimatum to Great Britain, demanding that it withdraw all its reinforcements deployed to the country from June 1, 1899. However, the ultimatum elapsed without a settlement.
War broke out on October 11, 1899.

The conference, which was organized in Bloemfontein, capital of the Orange Free State, failed to produce any headway, as both Milner and Kruger refused to reach a compromise. And so the Second Boer War erupted just a few months later. Image: Alfred Milner, 1st Viscount Milner, was High Commissioner of Southern Africa from 1897 to 1901
Who were the Military Generals of Great Britain and the Boers?
The Boers were led by prominent men and generals such as Pieter (Piet) Arnoldus Cronjé, Petrus (Piet) Jacobus Joubert, Louis Botha, Christiaan Rudolf de Wet, Lucas Johannes Meyer, Jan Kemp, Jacobus Herculaas de la Rey, Jacobus Philippus Snyman, and Ignatius Ferreira.

Leaders of the Boer republics during the Second Boer War. From left to right: Piet Cronjé, Schalk Willem Burger, Koos de la Rey, Martinus Theunis Steyn, and Paul Kruger
Great Britain’s military generals of the Second Boer War included General Redvers Henry Buller, Horatio Herbert Kitchener, Frederick Sleigh Roberts, Robert Baden-Powell, Paul Sanford Methuen, William Forbes Gatacre, Robert George Kekewich, and Brenton von Donop.

British political and military leaders during the Second Boer War. From left to right: Alfred Milner, Lord Roberts, and Herbert Kitchener
What was the military strength of the Boers and the British in the Second Boer War?
The Boers lacked a formal army and depended on a militia system. During the war, the government, under the Kommando system, enlisted all physically fit men between 16 and 60 for the army. Citizens were required to bring their guns and horses. Also, the Boer republics government also distributed thousands of rifles to them during the war.

Boer guerillas during the Second Boer War
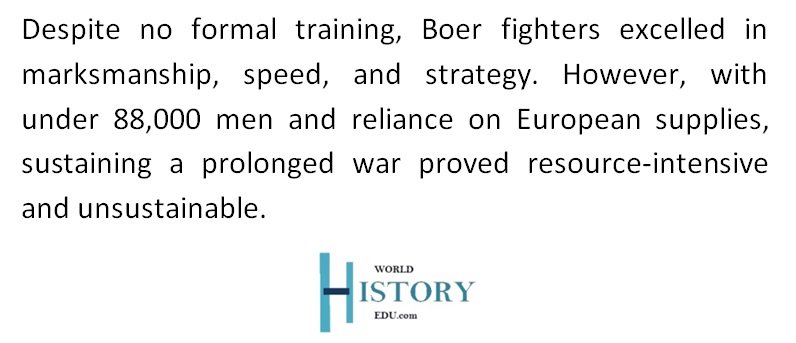
Despite lacking formal military training, the Boer fighters were strong combatants with exceptional marksmanship. They had honed their firearms abilities as hunters and via target shooting contests. They were also very fast. Every Boer soldier could dismount and launch a hail of precise rifle fire after scurrying and seizing strategic territory. However, they could muster less than 88,000 men and had the disadvantage of sustaining a protracted war, which required a lot of resources. They also imported most of their equipment from Europe, which meant a prolonged war cost would be unbearable.
On the other hand, the British were highly experienced in colonial wars. They were more advanced in military technology and tactics than the Boers. They also outnumbered the Boers. With about half a million troops, it could deploy more soldiers than the Boers and wage a protracted war without sustaining huge casualties. However, their only drawback was their limited expertise in dealing with modern firepower. As a result, they endured several unfavorable surprises from the Boers’ arsenal throughout the fight.
Role of Native Black South Africans and Indians in the Second Boer War
The most remarkable feature of the Second Boer War was that it was fought between white people on a territory with a predominantly Black African population.
In the Second Boer War, the Boers and the British declared that the battle was a “White Man’s War.” As a result, during the initial stages of the hostilities, they made a covert agreement that neither side would arm the native black populace.
However, as the battle progressed, they found it increasingly impossible to maintain that pledge and began using armed native Africans as war scouts.
According to historical estimates, the British Army employed about 30,000 native Africans as sentries and scouts during the Second Boer War. In addition, they employed about 100,000 blacks as laborers, wheelwrights, builders, transport drivers, blacksmiths, and farriers.
The Boers also used the native Africans for forced labor, often digging trenches and running transport services.
Even though the Indian army was not sent to South Africa, a few Indian servants and stretcher carriers participated in the war. There were close to 1,000 free Indians and indentured employees from sugar plantations who made up the Indian Ambulance Corps during the war.
Which countries assisted the Boers or the British during the Second Boer War?
During the Second Boer War, Britain’s colonial forces from Rhodesia, Natal, and Cape Colony significantly aided them. In addition, they received massive support from volunteers from other parts of the British Empire, mainly from Canada, Australia, New Zealand, and India. The war’s latter stages also witnessed many black African recruits contributing to Britain’s war effort.
However, the international community was generally hostile to the British and supportive of the Boers. The Boer cause drew numerous volunteers from neutral nations across the globe, including the United States, Russia, the German Empire, and even certain countries of the British Empire, such as Ireland and Australia.
Phases of the War
Historians often tend to place the Second Boer War into three phases. They are as follows:
-
The First Phase: Boer Offensive
On October 11, 1899, after both sides’ ultimatums were rejected, war was declared between the British and the two Boer republics (the Orange Free State and the SAR). The Boer republics struck first. This was because, during the first phase of the war, the British were unprepared and lacked military strength in the region.
Boer troops launched two assaults: one from the South African Republic into the British territory of Natal, and the other from the Orange Free State into the Cape Colony. Additionally, the northern parts of the Cape Colony joined the Boer troops in their uprising against the British.
Between the late 1899 and the early 1900, the Boers, led by Paul Kruger, secured victories against British forces, commanded by General Redvers Henry Buller in a series of major battles. They besieged the British-controlled towns of Kimberley, Ladysmith, and Mafeking (Mafikeng). Boer’s triumphs at Magersfontein, Stormberg, and Colesberg were stand-out victories for them. They occurred between December 10 and 15, 1899, and became known as “Black Week.”

Boers in a trench at Mafeking, 1899
-
The Second Phase: British resurgence and offensive
Kruger’s attack in October 1899 caught the British off guard. However, a large influx of British soldiers into South Africa in the early 1900s rendered an inevitable Boer loss.
In the second phase of the war, the British, under the command of Lords Horatio Kitchener and Frederick Roberts, experienced many triumphs. They defeated the Boer army to claim the besieged towns of Mafeking, Ladysmith, and Kimberley. In addition, they conquered the Boer troops in the field and quickly established rail transport lines.
The British also took over Bloemfontein (Orange Free State’s capital) in February 1900 and Pretoria and Johannesburg (SAR’s capital) in June and May 1900, respectively.
Although the British searched to capture Boer leader Paul Kruger, he was able to evade and flee to Europe. However, although many Europeans sympathized with the Boers, Kruger found it very difficult secure tangible European assistance for the Boers and their cause.

British senior military officer Lord Roberts entering Kimberley in February 1900 following the lifting of the siege
-
The Third Phase: Guerrilla War and British Concentration Camps
By September 1900, Great Britain had attained dominant control of the Boer Republics (SAR and the Orange Free State), except for the northern parts of the SAR.
However, they discovered that they could only exert control over the region when their columns were physically present. British control over a town or neighborhood waned as soon as the columns left. It meant the hundreds of thousands of British forces could not properly control the vast lands of the two Boer republics.
On the other hand, the huge gaps between the British columns gave the Boer commandos a great deal of mobility. As a result, the Boer military leaders decided to employ “guerilla warfare.”
They planned to deal with the adversary and cause as much harm as possible before moving away and disappearing when the enemy sent reinforcements. The Boer military generals were sent to their various districts (Western Transvaal, Eastern Transvaal, Orange Free State, and Cape Colony), where they launched a series of guerilla attacks against the British.
-
Western Transvaal
After September 1901, the Boer military leaders in the Western Transvaal were highly active. In this location, significant battles were fought between September 1901 and March 1902. Boer leader General De la Rey’s soldiers assaulted the British at Moedwil on September 30 and Driefontein on October 24, 1901. However, they were forced to retreat since the British fought valiantly.
In February 1902, major battles took place in the region after De la Rey attacked Britain’s column at Sterkspruit. He captured the column and seized a ton of ammunition from the British.
In response, British commander Lord Methuen moved his forces to Klerksdorp to deal with De la Rey for the Boer onslaught. On March 7, 1902, Boer forces attacked Methuen’s advancing column’s rear guard at Tweebosch. In no time, confusion ruled the British ranks. The Boers injured and captured Methuen as well. De la Rey’s greatest triumph in the war was his attack at Tweebosch.
The Boer triumphs in the west spurred the British to take more aggressive action. As a result, numerous British reinforcements were deployed to the Western Transvaal in March 1902.
On April 11, 1902, the British forces under General Grenfell and Kekewich confronted the Boer army under General Bon Donop at Rooiwal. The British soldiers were expertly positioned on the slope, trampling the Boers and galloping through the terrain. They beat the Boers savagely, causing them severe losses. This clash was the final major battle of the Second Boer War.
-
Orange Free State
The Boer troops in the Orange Free State relocated to the Brandwater Basin when the British took Pretoria. This, however, only provided a short-term haven. The British seized control of the mountain passages leading to Brandwater Basin after trapping the Boers. Britain’s General Hunter was the leader of the British troops that conducted the trap. As a result, 4,500 Boer fighters surrendered, and their equipment was seized.
However, these casualties didn’t impact the Boer army much since most of its committed and active leaders were still at large.
In response to the British offensive, Boer commander De Wet incited a string of assaults and raids on the British in the Orange Free State. He also took command of the second invasion of Cape Colony at the end of January 1901. However, the invasion was unsuccessful due to the lack of a widespread Cape Boer insurrection. British soldiers pursued De Wet’s men furiously, but they managed to cross the Orange River.
De Wet and other Orange Free State Boer commanders kept relatively quiet after the invasion since British sweeps had practically left the area barren.
-
Eastern Transvaal
General Louis Botha and Ben Viljoen led two Boer troops engaged in combat in the southeast and northeast parts of the region.
In September 1901, Botha’s men launched raids on railways and even launched a second invasion of Natal. However, British forces later mounted more significant and brutal assaults against Botha’s men. Eventually, he was forced to leave the Highveld and withdraw his forces to a small area bordering Swaziland.
The activities of Ben Viljoen’s men in the northeastern region slowly decreased after the British offensive. Unfortunately, the British eventually captured Viljoen.
-
Cape Colony
Commander de Wet left men under Boer rebels to continue the guerilla war in the Cape Midlands. Unfortunately, this was one of the least valiant campaigns. As a result, the British captured and hanged many Boer rebels, including the great Commander Scheepers.
However, in September 1901, Boer soldiers led by Jan Christiaan Smuts launched another assault on the British army in the Cape Colony. They endured terrible hardships and pressure from British columns and ultimately eluded their adversary. In addition, they seized many weapons from the British army.
Smuts’ forces significantly increased throughout the war, adding more than 1,000 soldiers. However, there was no widespread insurrection, and the state of affairs in the Cape remained relatively peaceful.
Britain’s use of Concentration Camps in the Second Boer War
The British implemented the “Scorched Earth” strategy to prevent the Boer forces from receiving supplies. It involved burning Boer farms, butchering their cattle, and imprisoning numerous Boer people in camps. The camps were initially called “refugee camps” and later became known as “concentration camps” due to overpopulation. Forty-five camps were built for Boer refugees, while 64 tented camps were built for black Africans. The majority of people in the camps were children and women.

Boer women and children in a concentration camp set up by the British
However, when Lord Kitchener took control of the camps, the conditions of the refugees and prisoners deteriorated drastically. Numerous people died as a result of deliberate negligence. They battled poor rations and sanitation, overcrowding, inadequate medical facilities and equipment, and a lack of proper shelter. Typhoid, measles, and dysentery outbreaks occurred at the camps due to the combination of these conditions.
Many reports after the war stated that over 14,000 black Africans and almost 30,000 Boers (over 90% being children) perished in the camps due to malnutrition, starvation, and disease. In addition, between 18,000 and 28,000 Boers were killed. However, the causes of the deaths of 107,000 Black Africans detained in the camps remained a mystery.
Final stages of the war
British attacks and offensives were more effective as the war approached its climax. They successfully created concentration camps, wire fences, and blockhouses. These strategies limited the mobility of the Boer forces. However, it also helped the British to launch many devastating assaults on their opponents, which eventually led to their comprehensive victory in the Second Boer War.
Prisoners of Wars (POWs) and Casualties of the Boers and British in the Second Boer War
The British captured its first major Boer POWs on October 21, 1899, during the Battle of Elandslaagte. Initially, they locked the prisoners on their ships in South Africa. However, as the numbers increased, the British authorities sent them overseas. This was because they feared some of their soldiers might feel sympathetic for some of the prisoners and free them.
They opened their first overseas POW camps in Saint Helena in the South Atlantic Ocean. About 5,000 prisoners were sent to Saint Helena. In addition, other overseas centers were set up in Bermuda, India, Portugal, and Sri Lanka, holding numerous POWs.
In total, the protagonists of the Second Boer war suffered about 75,000 deaths. In addition, an estimated 25,000 Boer civilians and 6,000 Boer soldiers died during the war. The British also lost some 22,000 troops (over 50% losing their lives through sickness).
The neutrals, thus black Africans and Indians, also recorded fatalities, losing about 20,000 people during the war.
Boer Surrender and the Treaty of Vereeniging
By April 1902, most Boer leaders were keen to arrange the release of their fellow Boers from the concentration camps to preserve their lives. This pressure forced them to officially surrender on May 31, 1902, accepting the British demands in the Treaty of Vereeniging.
However, the British gave the Boers £3,000,000 for development and reconstruction. They also promised them eventual independence.
The independent Boer republics were immediately changed to the “Transvaal” and “Orange River” British colonies. In 1910, the colonies were integrated with the Cape Colonies and Natal, forming the “Union of South Africa,” a self-governing territory within Britain’s Empire.
In the subsequent decades, divisions weakened Boer’s influence in South Africa. They were mainly divided into factions known as the Bittereinders (“bitter-enders”) and the Hensoppers (“hands-uppers”). While the latter consistently capitulated and collaborated with the British, the former desired to continue fighting the British.
Eventually, the Bittereinders focused on advancing the constitution. However, they also developed the National Party, ruling South African politics between the 1940s and the 1990s.
Although hostilities between English and Afrikaners have decreased over the past century, there are still traces of their past animosity and mistrust.
Did you know?
78 members of the British Armed Forces received the Victoria Cross for their bravery during the Second Boer. First presented by Queen Victoria in 1857, the Victoria Cross (VC) was established as the highest award for gallantry in the face of the enemy attack. The honor can bestowed upon British and Commonwealth forces.

Victoria Cross